Download PDF
Audio Effector: Equalizer icon
Music-reactive spectrum visualizerby Herbistry · for Final Cut Pro & Motion

Audio Effector: Equalizer

Your music, moving on screen. Audio Effector: Equalizer is an animated EQ that reacts to your song, right inside Final Cut Pro and Motion. Bars, waveforms, radial rings, colors, and a rack of stackable effects. No song in the project? It dances to a beat you set.

The short version

What the Equalizer does

Add it as a generator, drop your footage or a color on the track below, and you have got an equalizer bouncing to your music on screen. Load a song and the bars ride the real audio: they jump on the bass, the waveform tracks the melody, the color moves with it. Ten styles, from tall spectrum bars to radial rings and an oscilloscope, plus a whole rack of animation effects you can stack two deep. Fifteen presets get you a finished look in one click.

One thing to know up front: Final Cut does not let a generator listen to your timeline audio, so the Equalizer reads the song from a file you choose. Point it at the same track you cut to and the bars land on the same beats. No song at all? It runs on a beat you set instead, so you always get movement. This manual covers the whole workflow, every control, and the presets.

First run

Install, add, and unlock the Equalizer

From download to a clean export. Here is the whole path.

  1. Install it. Download the installer and open it. It is notarized by Apple, so there are no security warnings to fight. If Final Cut or Motion was open, quit and reopen it so it picks up the new plugin.
  2. Add it to your timeline. The Equalizer is a generator, not a clip effect. In Final Cut Pro, open the Generators browser, find Herbistry ▸ Audio Effector: Equalizer, and drag it onto your timeline. Put your footage or a background on the track right below it, since the equalizer plays over whatever is under it. More on this just below.
  3. Try it free. Every style, effect, and preset works right away, no time limit. The catch is a small Herbistry leaf watermark over the picture, so the trial is perfect for auditioning but not for a clean export.
  4. Buy a license. Grab it from the Audio Effector: Equalizer page on fordeetv.com. Checkout is quick, and your license key arrives by email in your receipt.
  5. Activate it. In the inspector, find the License row (it reads "Enter License…"). Click it, paste your key from the receipt email, and hit Activate. The watermark disappears and your exports come out clean. It is a one-time thing, the plugin remembers.
  6. On more than one Mac. One license covers two Macs. Need a third? Free a slot first: click the Licensed ✓ (Deactivate) row on a Mac you still have and deactivate. No longer have that Mac? Sign in at the Lemon Squeezy orders page with the email you bought with, click your license key to see its activations, and deactivate the one you want to free. That same page is where you look up your key if you ever lose it.

Good to know

The Equalizer does all its work on your Mac. Your video and your song never leave your computer. The only thing that ever goes out is the quick check that confirms your license key when you activate.

Where it goes

It's a generator, not a clip effect

This is the one thing that trips people up, so here it is clearly. A generator makes its own picture from nothing, so it does not sit on your footage. It sits on its own layer, above it.

Do this

The setup that works
  • Add the Equalizer as a generator, on its own layer.
  • Put your footage or a background on the track right below it.
  • Pick your song in the plugin's Song control.
  • The equalizer draws over transparent space, so wherever there are no bars, your background shows straight through.

Not this

Common mix-ups
  • Don't drop it onto a clip like a filter. It isn't one, and it won't attach.
  • Don't expect it to hear your timeline's audio track. Final Cut doesn't allow that, so you point it at a song file instead.
  • Don't hide your background above it. Backgrounds go underneath.

Rule of thumb

Generator on top, background below, song picked in the plugin. That is the whole setup. It works exactly the same in Motion, where you add it as a generator layer with your footage underneath. And it fills whatever shape your project is, vertical for a reel, square for a feed post, or widescreen, so it fills the frame either way with no black bars.

The layout

The inspector, top to bottom

Everything lives in one inspector. It reads top to bottom, and the controls that don't apply to your setup hide themselves, so it stays tidy. Here's the map.

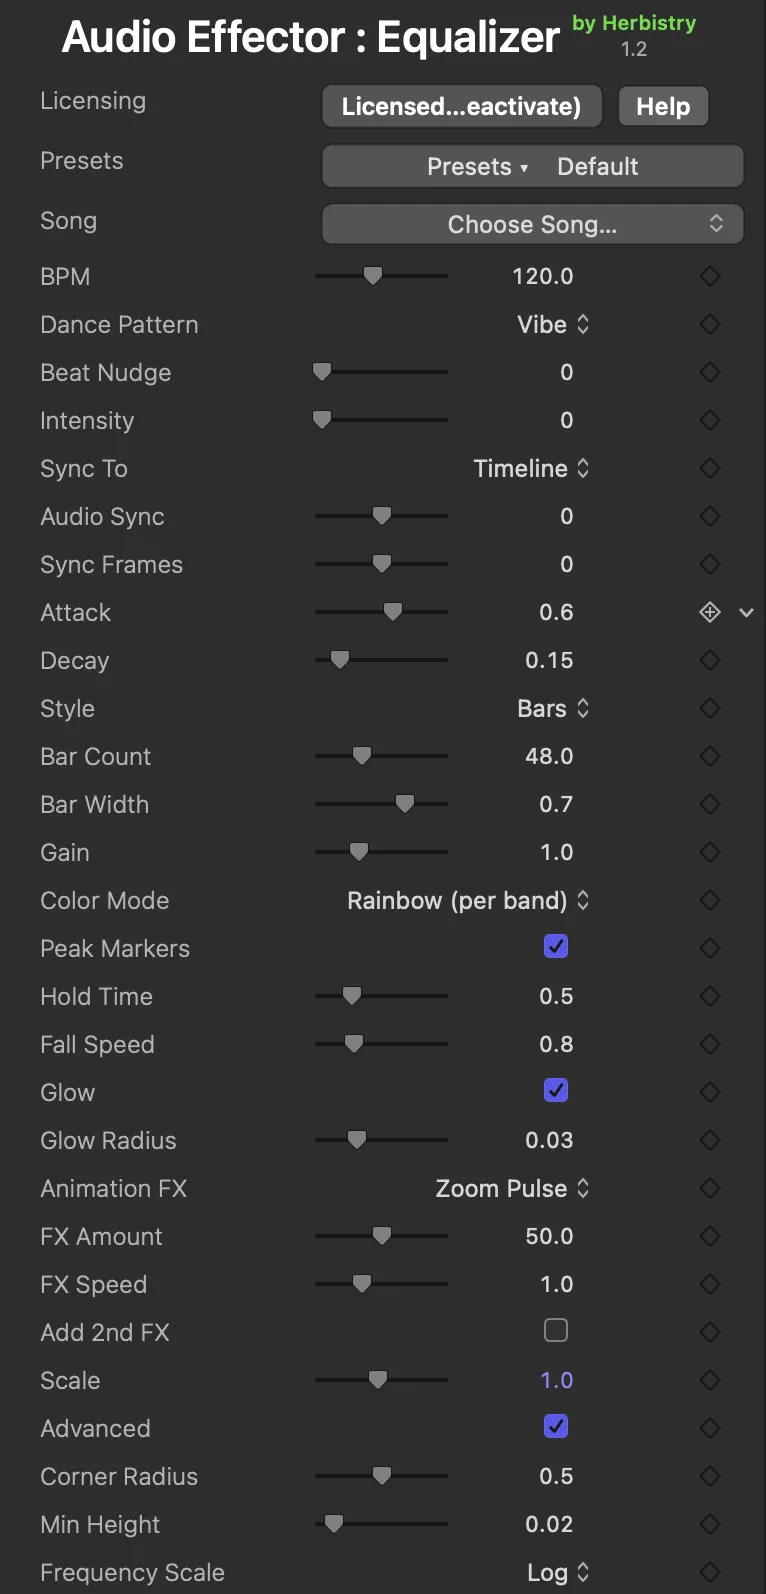
The inspector with no song loaded: the Song row reads Choose Song, and BPM and Dance Pattern are showing, then Beat Nudge, Intensity, Sync To, Audio Sync, Sync Frames, Attack, Decay, and the rest of the controls down to Frequency Scale.

No song loaded

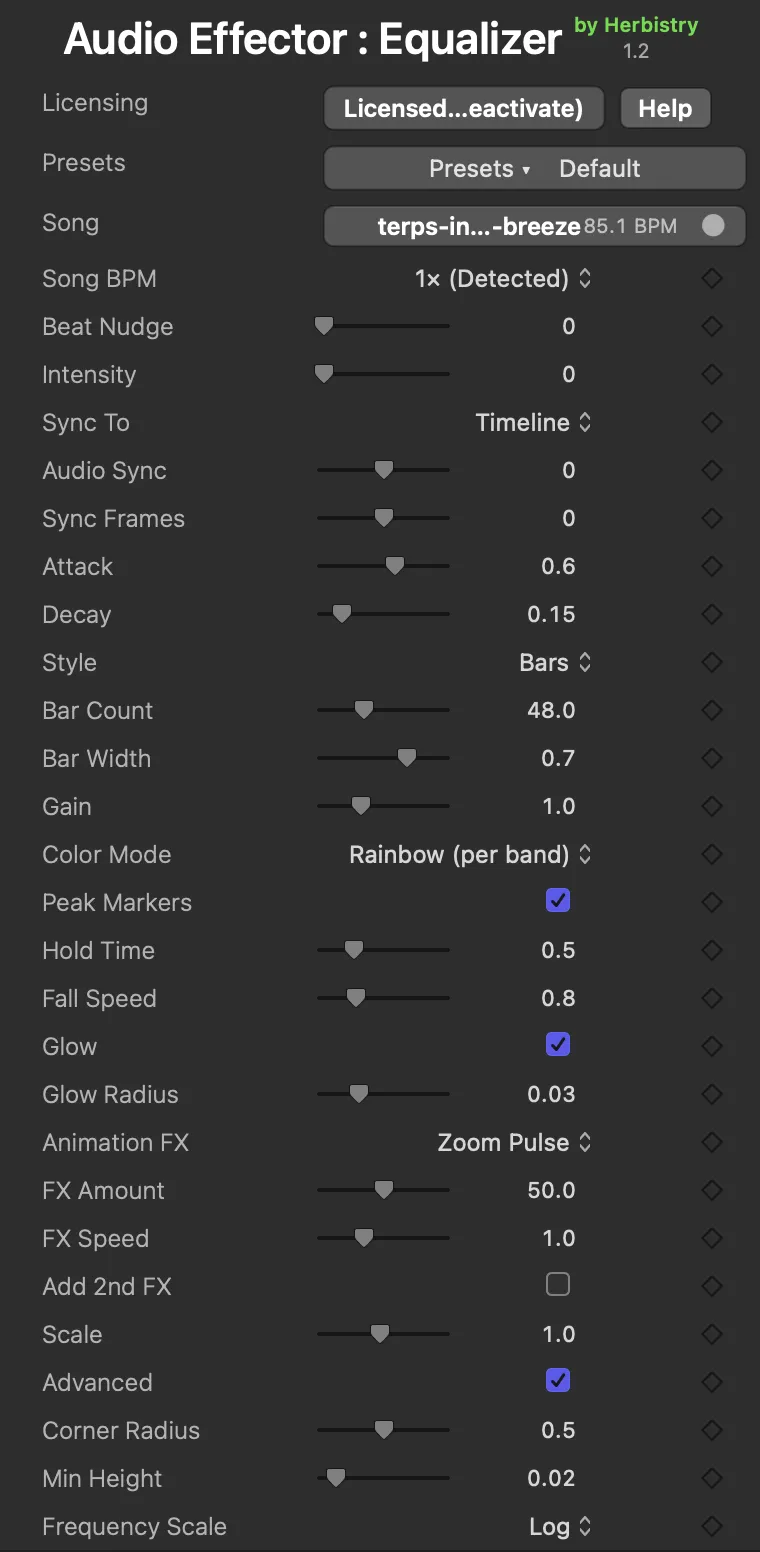
The inspector with a song loaded: the Song row shows the loaded song and its detected tempo, and Song BPM takes the place of BPM and Dance Pattern, then Beat Nudge, Intensity, Sync To and the rest of the controls down to Frequency Scale.

Song loaded

The same panel, two states. Controls that don't apply hide themselves: with no song you set BPM and Dance Pattern to drive the dance; load a song and those give way to Song BPM, the tempo multiplier. Everything from Beat Nudge down stays put.

Top of the panel

  • License activate your key, or free a seat
  • Presets load a full look, or save your own
  • Song pick the audio file the bars follow

Audio

  • Intensity the master: how hard the bars react
  • Sync To clip head, or timeline for clean cuts
  • Audio Sync where the song sits on the timeline
  • Sync Frames frame-accurate fine-tune
  • Song BPM tempo multiplier, shown when a song is loaded
  • BPM & Dance Pattern shown only when no song is loaded
  • Beat Nudge shift the beat within itself

Style & Shape

  • Style ten equalizer looks
  • Bar Count & Bar Width how many bars, how fat
  • Gain overall amplification

Color

  • Color Mode four color modes plus eight built-in palettes
  • Color A & B your own colors for Solid and Gradient

Motion & FX

  • Peak Markers & Glow the caps that ride the tops, and the bloom
  • Animation FX a treatment over the whole EQ, plus a second one you can stack

Transform & Advanced

  • Scale size the whole equalizer up or down
  • Advanced opens Attack, Decay, Corner Radius, Min Height, Frequency Scale

The audio engine

Feed it your song

Give it the song once and the bars know where every beat is. This is the part that makes the Equalizer tick.

  1. Click "Choose Song…" and pick the audio file. MP3, WAV, M4A, AAC, AIFF, CAF, FLAC, anything your Mac can play. Use the same file you cut into your timeline.
  2. Let it analyze. It reads the song once, the loudness, the bass, mids, treble, and the tempo, right there on your Mac. Takes a moment, and it only happens once per song. If the tempo comes in at half or double what you expect, the Song BPM multiplier puts it right in one click.
  3. Cut it to the beat. Set Sync To to Timeline and you can slice the equalizer into as many pieces as you want, each with its own look, and they all stay locked to the song with no re-syncing. If your song does not start at the very front of the timeline, set Audio Sync to how far in it starts, once, then Sync Frames for the last frame or two. Keeping it to a single clip? Leave Sync To on Clip Head and the song just starts with the clip.
  4. Set the feel. Intensity is the master dial: how hard the quiet bands lift and the whole thing reacts. Under Advanced, Attack and Decay shape how fast the bars rise and fall, snappy and percussive or smooth and flowing.
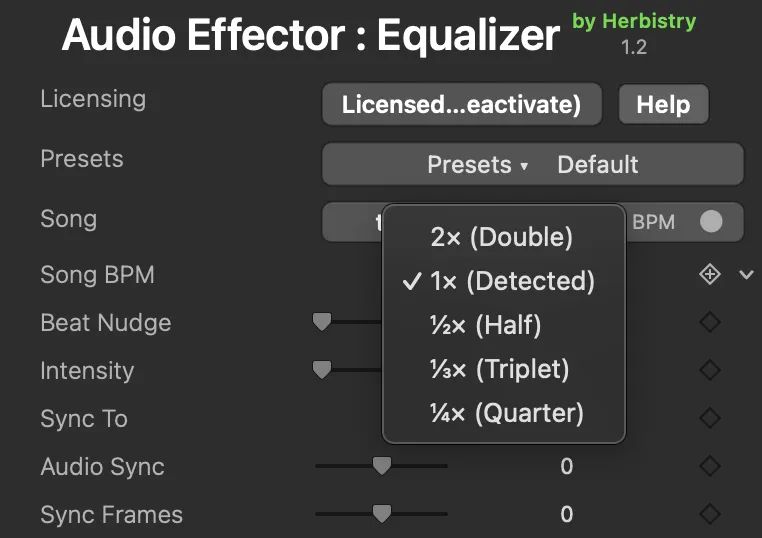
The Song BPM popup open with a song loaded, showing its five choices: 2× (Double), 1× (Detected) with a checkmark, ½× (Half), ⅓× (Triplet), and ¼× (Quarter).

With a song loaded, Song BPM is the tempo dial. The Detected setting runs at the tempo it found; the others lock the animation to an exact double, half, triplet, or quarter of it, so it stays on the beat and never drifts.

No song? It still moves

No music in the project, or you just want a vibe? With no song loaded, the Equalizer dances on its own. Set BPM to your track's tempo, pick a Dance Pattern, and the bars groove along. Beat Nudge slides the beat: 0 is right on it, 0.5 is the off-beat, 1 is a full beat late. Beat Nudge works with a song too, for when you want the hits to fall on the snare instead of the kick.

The five dance patterns

Vibe

  • The defaultlayered, musical movement with sharp accents on the beat

Sine Wave

  • Smooth rolling wavesclean and hypnotic, no hard hits

Pulse

  • Everything punches on the beattight and percussive

Ripple

  • A wave travels across the barsa moving crest, left to right

Sparkle

  • Random twinkles on the beatscattered, glittery pops

Mixing frame rates

Final Cut handles most frame rate mismatches invisibly. The exception is 23.98 or 24 fps footage in a 25 fps project, or 25 fps footage in a 23.98 or 24 fps project: there it changes the clip’s speed by about 4%. The Equalizer stays locked to your timeline, so the animation keeps matching what you hear and the picture is the thing that shifts. There is no setting to turn this off. Either match your project’s frame rate to your footage, or convert the clip before you bring it in.

Pick a look

Ten equalizer styles

The Style menu is the shape of your equalizer. Same audio, ten completely different looks. Rainbow color is the default across all of them.

Bars & blocks

  • Bars the classic tower spectrum, growing off the baseline
  • Center Mirror bars grow out from the middle, both directions
  • LED Segments chunky segmented meter columns, the VU look
  • Dots a dot-matrix grid that fills as bands get loud

Lines & fills

  • Line a single thin spectrum line tracing the bands
  • Area the same curve, filled solid underneath

Radial

  • Radial (Outward) bars burst out from a center ring
  • Radial (Inward) bars point in toward the center

Waveform

  • Waveform an oscilloscope trace that reacts across its whole width
  • Mirror Waveform the same scope, mirrored into a symmetric shape

Every control

The controls, one by one

Grouped the way the inspector is. Most are a single slider; the ones with extra options say so.

Audio

Intensity

Master

The master dial for how hard the equalizer reacts. It lifts the quiet bands so the whole spectrum comes alive and pushes the loud ones harder. If the look is right but it is all too flat or too much, this is the one slider to reach for.

At 0

Flat and literal. Only the loud bands move.

At 100

Quiet bands lifted, the whole frame fills.

Sync To

Cut-friendly sync

How the equalizer follows your song. Clip Head, the default, starts the song at the front of the clip. Timeline locks the song to the project timeline instead, so you can cut the equalizer into as many pieces as you like and every piece stays in sync, with nothing to re-line-up. Reach for Timeline the moment you start slicing the equalizer to the beat.

Clip Head

Song starts at the clip's front. Simple, but each cut restarts it.

Timeline

Song follows the timeline. Cut freely, it stays locked.

Audio Sync

Line it up

Where your song sits, so the equalizer matches what you hear. In Timeline mode, set it to how far into the timeline your song starts; in Clip Head mode, it slides the song against the clip. Put the seconds here, and if you need it frame-perfect, add the frames in Sync Frames just below. Always a positive number, and it reaches up to two hours in for feature-length projects.

Sync Frames

Fine-tune

Frame-accurate fine-tuning on top of Audio Sync, for when the reaction is off by just a frame or two. It counts in your project's frame rate, so a few frames means a few frames whether you are at 24, 30, or 60. Audio Sync gets you the seconds, Sync Frames gets the last little bit.

Song BPM

Tempo multiplier

Load a song and the Equalizer finds its tempo for you and locks the beat to it. This popup rides on top of that, and it is the tempo row you get once a song is loaded. 1× (Detected) is the default and runs at the tempo it found. If the detection came in at half or double the real speed, which happens on plenty of electronic and hip-hop tracks, pick or ½ to put it back on the money. Or drop to or ¼ just because a slower pulse feels better on the shot. Every option is an exact slice of the song's own tempo, so the animation stays locked and never drifts off, however long the clip runs. Pick a different song and it snaps back to 1× on its own.

Beat Nudge

Beat phase

Shifts the beat within itself. 0 sits on the beat, 0.5 lands on the off-beat, 1 is a full beat late. Works whether you are on a song or a manual BPM.

Attack & Decay

Advanced

How fast the bars rise (Attack) and fall (Decay). Fast on both reads snappy and percussive; slow reads smooth and flowing. They live under the Advanced toggle.

Style & Shape

Bar Count

8 to 128

How many bars the spectrum is split into. A low count reads bold and blocky; a high count reads like a fine, detailed spectrum.

Bar Width

Fat or thin

How wide each bar is, from thin needles with gaps to bars that touch edge to edge. Pairs with Bar Count to set the whole density of the look.

Gain

Amplify

Overall amplification of the signal. Turn it up to make a quiet mix drive the bars taller. Different from Intensity: Gain is raw volume, Intensity is how the reaction is shaped.

Radial Inner Radius

Radial styles

Only on the two Radial styles, and it appears right under Style. It sets the size of the empty ring in the middle that the bars grow from: small for a tight sun, large for a wide halo. Hidden on every non-radial style.

Color

Color Mode

Twelve modes

How the bars get their color. Four modes run off your own colors: Rainbow (per band) is the default, a full spectrum spread across the bars; Solid is one color; Gradient runs Color A into Color B; Reactive (by level) shifts each bar's color with how loud it is.

Under those sit eight built-in palettes, each a ready-made color ramp painted up every bar: Cyanotype, Sepia, Fire, Neon, Teal & Orange, Vaporwave, Toxic, and Infrared. Pick one and you're done, no color picking needed.

Color A & Color B

+ Direction

Color A is your solid color, or the start of the gradient. In Gradient mode, Color B is the far end and Gradient Direction runs the blend Vertical or Horizontal.

Color A applies to Solid and Gradient; Color B shows up for Gradient only. The eight palettes bring their own colors, but they still honor Gradient Direction, so you can run any of them up the bars or across them.

Peaks & Glow

Peak Markers

+ Hold & Fall

Little caps that ride the top of each bar and drift back down, the classic VU meter look. Hold Time is how long a cap hangs at a new high; Fall Speed is how fast it drops after.

Glow

+ Radius

A soft bloom around the bars, in their own color. Glow Radius sets the spread. On the two radial styles a smaller glow also gives you a bigger ring, so it doubles as a framing control there.

Transform

Scale

Size + fractal

Sizes the whole equalizer up or down. Because it scales the drawing itself instead of stretching a rendered image, it stays crisp at any size.

With Animation FX set to Kaleidoscope, Scale does double duty. Pull it below 1.0 and the mandala folds into itself as a self-similar fractal: the lower you go, the deeper it folds, from a subtle texture near 0.95 down to a dense fractal at the bottom. It blooms deeper on the beat and carries your color through the pattern. At 1.0 and up it is the normal zoom.

Advanced

Corner Radius

Bar tops

Rounds the tops of the bars, from hard square edges to fully rounded caps. A quick way to shift from a technical look to a softer one.

Min Height

The floor

A floor under every bar so quiet bands still show a sliver instead of vanishing. Raise it to keep the shape readable through quiet passages, or to float the whole equalizer off the baseline.

Frequency Scale

Log / Linear

Log is the default and spaces the bands the way we hear, giving the bass plenty of room. Linear spreads them evenly by frequency, which crowds the low end and opens up the highs.

The FX engine

Animation FX

A visual treatment over the whole equalizer, and every one of them moves to the beat. Pick one from Animation FX, dial FX Amount and FX Speed, and go. The FX controls appear once you pick a mode.

Distort & displace

  • RGB Shift splits the color channels apart on the beat
  • Glitch digital tears that jump on the hits
  • Pixelate crunches the whole thing to 8-bit blocks
  • Wave ripples the equalizer like water
  • Shake jolts the frame on every hit

Zoom & fold

  • Zoom Pulse punches in on the beat, bolted to the floor
  • Kaleidoscope folds the equalizer into a mandala

Color & motion

  • Hue Flow rolls the colors through the rainbow
  • Scroll marches the EQ sideways, or spins a radial one

Hands-off

  • Auto-Cycle rotates through the eight treatments on the beat

Dialing the effect

FX Amount

0 to 100

How strong the effect is. On most it's straight intensity; on Kaleidoscope it's the fullness of the fold.

FX Speed

Pulse rate

How fast the effect pulses against the beat. 1 is on the beat, 2 is double-time, 0 freezes the motion.

FX Direction

Directional modes

Which way the directional effects push, Horizontal, Vertical, or Radial. Shows up for RGB Shift, Glitch, and Wave.

FX Cycle Rate

Auto-Cycle only

For Auto-Cycle, how often it switches effect: ½ Beat, 1 Beat, 1 Bar, or 2 Bars.

Kaleidoscope's Mandala Pattern

When a Kaleidoscope is running, the Mandala Pattern menu picks how it folds: Classic, Flower, Star, Tunnel, Spiral, or Grid. Each one turns the same spectrum into a completely different symmetry.

And here's the trick that unlocks a whole other set of looks: with a Kaleidoscope running, drop Scale below 1.0 and the mandala folds into a self-similar fractal that blooms on the beat. Each pattern folds into its own kind of fractal, so it's six more looks hiding in one slider. See Scale in the controls for the full rundown.

Stack a second effect

Turn on Add 2nd FX and pick a 2nd FX to layer a second treatment on top of the first, like a Kaleidoscope fold with a Pixelate crunch running through it. The two share Direction and Mandala Pattern, and an effect can't stack on itself. This is where the wild looks come from.

The combos are the whole point

Kaleidoscope plus Pixelate. RGB Shift plus Hue Flow. A radial style with Scroll spinning it. Between two stacked effects, six mandala patterns and their fractals, ten styles, and a dozen color modes, there are basically infinite equalizers in here. The presets are a tour of the good ones, so start there and then go build your own.
One click, full look

Presets

A preset sets every control at once: the style, the colors, the effects, the shape. Pick one from the Presets menu at the top of the inspector, then tweak anything you like. One thing presets never touch is your song. The look changes, the music stays.

Start here

Default

Bars · Rainbow · glow, no FX

The factory state and the instant reset. A clean rainbow bar spectrum with a soft glow. When a look gets away from you, this is the way back.

Essentials

Studio Spectrum

Bars · Rainbow · subtle glow

The clean pro spectrum. A crisp rainbow bar analyzer that reads instantly and sits on top of anything.

Oscilloscope

Waveform · phosphor green · Scroll

A single phosphor-green scope trace scrolling like a lab monitor. Retro, minimal, and endlessly watchable.

Fat 12 Band

Center Mirror · 12 fat bars · Reactive VU + Hue Flow

Twelve chunky mirrored bars in reactive VU color, drifting slowly through the spectrum. A bold, physical meter.

Vibrant

Fire Starter

Area · yellow to red · Glitch flicker

A filled spectrum in a hot yellow-to-red gradient with a flicker of glitch. Looks like the bottom of the frame is on fire.

Ghostly Memories

Dots · rainbow · big glow + Sparkle

A floating dot-matrix EQ with a heavy bloom and sparkle motion. Dreamy, weightless, a little haunted.

Neon Wire

Line · cyan · RGB Shift

A single glowing cyan line with the color channels split apart. Clean neon with a chromatic edge.

Glitch

Arcade

LED Segments · Reactive VU · Pixelate

Segmented meter columns crunched into 8-bit blocks. Straight out of a cabinet from 1987.

Toxic Glitch

Mirror Waveform · yellow to green · Pixelate + Kaleidoscope

A mirrored scope in toxic yellow-green, pixelated and folded through a kaleidoscope. Loud and a little dangerous.

Noise Hypnosis

Mirror Waveform · white to black · Pixelate + Kaleidoscope (Tunnel)

Black-and-white pixelated waveform folded down a kaleidoscope tunnel. Hypnotic, stark, hard to look away from.

Psychedelic

Acid Mandala

Center Mirror · green to red · Kaleidoscope (Flower) + Hue Flow

A delicate flower-fold mandala in shifting green-to-red, with the hue rolling underneath. Full trip.

Portal

Radial (Outward) · rainbow · RGB Shift + Hue Flow

A rainbow ring bursting outward, channels split and hue rolling. Feels like something is about to come through it.

Vortex

Radial (Inward) · blue to violet · radial Wave

Bars pointing inward in a cool blue-violet, rippling with a radial wave. A slow pull into the center.

Lost in Space

Area · rainbow · fast Hue Flow + Kaleidoscope

A filled spectrum folded through a kaleidoscope with the color racing around. Deep-space drift.

Cosmic Ripples

Radial (Outward) · rainbow · Glitch + Kaleidoscope (Tunnel) + ripple

A rainbow burst rippling out in concentric rings that pump on the bass, folded down a tunnel. The showpiece.

Make it yours

Saving your own presets

Built a look you love? Save it and reuse it anywhere.

  1. Dial in the look until it is right.
  2. Open the Presets menu at the top of the inspector and choose Save Current Settings….
  3. Give it a name. It shows up under My Presets, right below the factory ones, and you can Rename… or Delete it from there.

What a saved preset keeps

It saves the whole look, every control at once, but not your song, so one preset works across every project and every track. Your saved looks live on your Mac, not inside a single project, so they follow you everywhere you edit.

Cheat sheet

Quick reference

The sliders at a glance, from one end to the other.

ControlLow endHigh end
Intensity0: flat, only loud bands move100: quiet bands lifted, frame fills
Gain0.1: barely there3: a quiet mix drives tall bars
Bar Count8: chunky and bold128: a fine, detailed spectrum
Bar Width0: thin needles1: bars touch edge to edge
Audio SyncNegative: song reads laterPositive: song reads earlier
Beat Nudge0: on the beat1: a full beat late (0.5 = off-beat)
BPM60: slow march200: double-time
Scale0.1: tiny2: fills the frame
Glow RadiusSmall: a tight edgeLarge: a soft bloom
FX Amount0: off100: full strength
FX Speed0: frozen3: triple-time pulse
Min Height0: quiet bars vanishHigh: a visible floor at all times
Corner Radius0: square tops1: fully rounded caps

Before you install

System requirements

The Equalizer is a Mac video plugin. Here is what you need.

Operating system
macOS 13.5 or later
Ventura and up.
Works in
Final Cut Pro 10.8.1 / Motion 5.8 or later
Added as a generator layer.
Mac type
Apple Silicon Mac
Runs natively on M1, M2, M3, and later.
Installing
A notarized installer
Download from fordeetv.com, then unlock with a license key.

Get help

Stuck on something?

Trouble installing, syncing a song, or unlocking the Equalizer? Reach out and we'll sort it.

Contact support →