Mirror Spin
The fold axisA single mirror fold of the frame, the clean, classic symmetry. Its signature move is the spin: the fold axis rotates and snaps on the beat, so the mirror line sweeps around. Mirror Spin Angle sets where the axis starts.
Fold your footage into symmetry, then make it move to the music. Audio Effector: Mimic mirrors, kaleidoscopes, and tunnels your video, and the whole look spins, pulses, and reconfigures in time with your song, right inside Final Cut Pro and Motion.
The short version
Drop Mimic on your footage, hand it a song, and the picture folds into symmetry that moves with the music. Pick a clean single mirror, a four-way split, or a kaleidoscope with up to 32 wedges, and bend it further with recursive Droste spirals or an infinity tunnel that pulls the image into depth. Six looks in all, and they stack. Then tell it what to follow, the beat or the loudness, bass, mid, or treble, and the mirrors spin, kick, and reconfigure in time with the track. Twelve presets get you a finished look in one click.
One thing to know up front: Final Cut does not let an effect listen to your timeline audio, so Mimic reads the song from a file you choose. Point it at the same track you cut to and the folds land on the same beats. No song at all? Set a BPM and it still moves. And when you just want the static, hand-driven symmetry with no music at all, Classic Mimic mode gives you the full manual rig. This manual covers the whole workflow, every control, and the presets.
First run
From download to a clean export. Here is the whole path.
Mimic does all its work on your Mac. Your video and your song never leave your computer. The only thing that ever goes out is the quick check that confirms your license key when you activate.
Clip or section
Mimic comes as a regular clip effect and as an adjustment-layer Title. Same controls in both, different reach.
One clip? Use the effect. A run of clips cut to music? Use the Title and stretch it over all of them, so the beat grid stays continuous across every cut instead of restarting on each one. It works the same way in Motion, where the Title behaves like an adjustment layer over the group below it.
The layout
Everything lives in one inspector, and it reads top to bottom. The controls that don't apply to your setup hide themselves, so it stays tidy: turn a look on and its options appear; load a song and the tempo controls swap over. Here's the map.
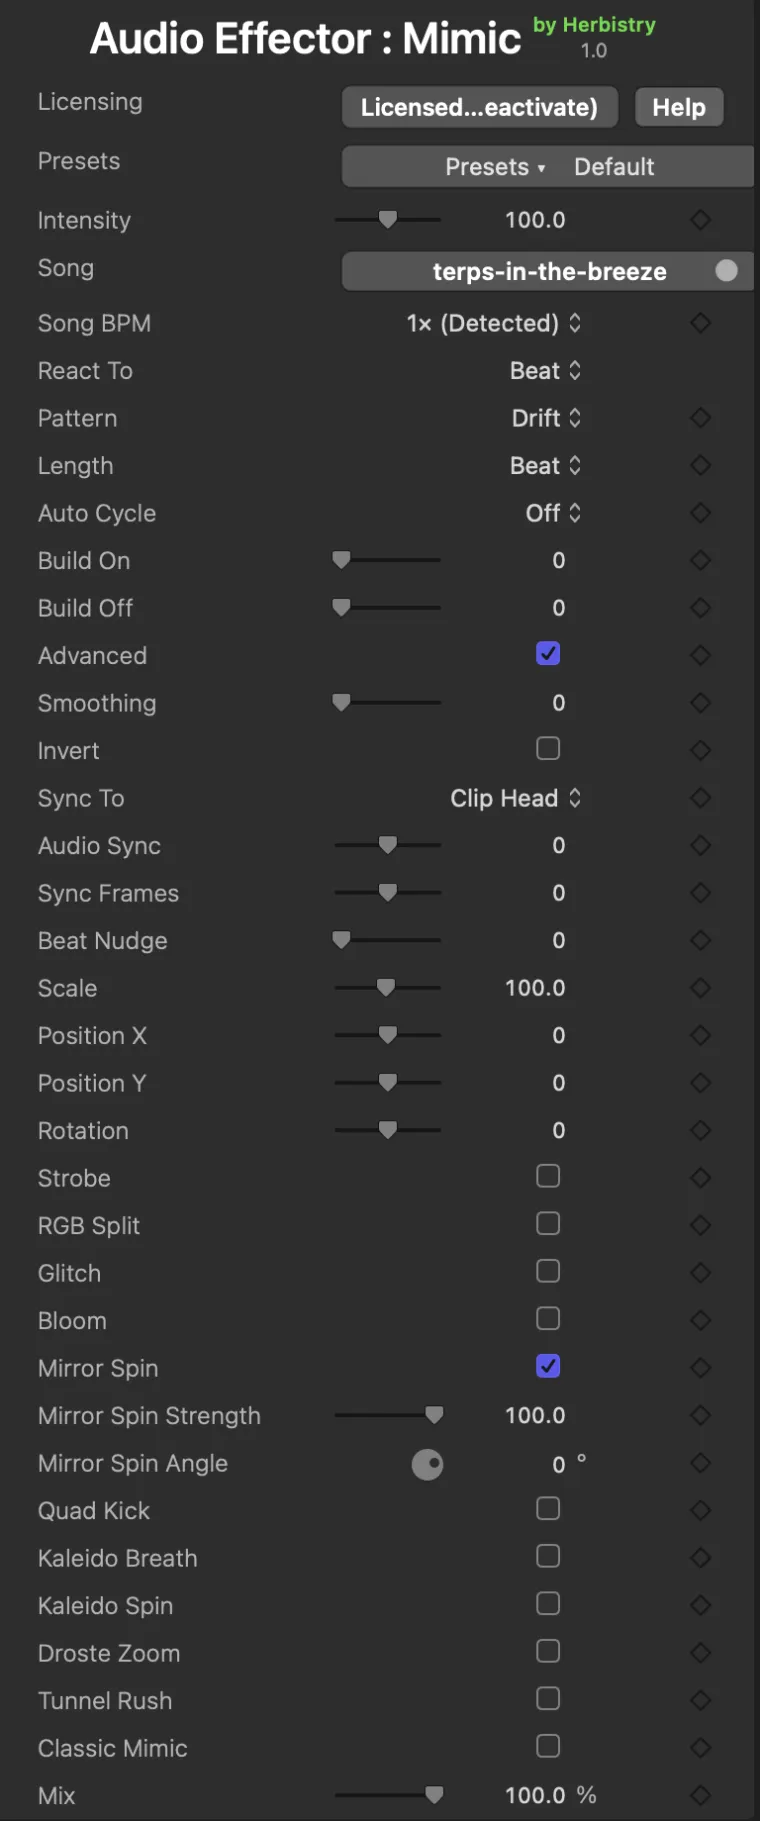
Song loaded

No song loaded
The same panel, two states (both with Advanced on). Controls that don't apply hide themselves: load a song and Song BPM appears just under it to fine-tune the tempo; with no song that row gives way to a manual BPM slider. Everything else stays put.
The audio engine
Give it the song once and every fold knows where the beat is. This is the part that makes Mimic tick.
On Beat, the tempo sets when the folds move and Pattern sets how. On a band, the live audio sets how big each hit is while Length still sets the cadence, so the mirrors pump with the actual sound instead of a steady metronome.
Load a song and Mimic finds its tempo for you and locks the beat to it. The Song BPM popup rides on top of that. 1× (Detected) is the default and runs at the tempo it found. If the detection came in at half or double the real speed, which happens on plenty of electronic and hip-hop tracks, pick 2× or ½× to put it back on the money. Or drop to ⅓× or ¼× just because a slower pulse feels better on the shot. Every option is an exact slice of the song's own tempo, so the motion stays locked and never drifts off, however long the clip runs. Pick a different song and it snaps back to 1× on its own.
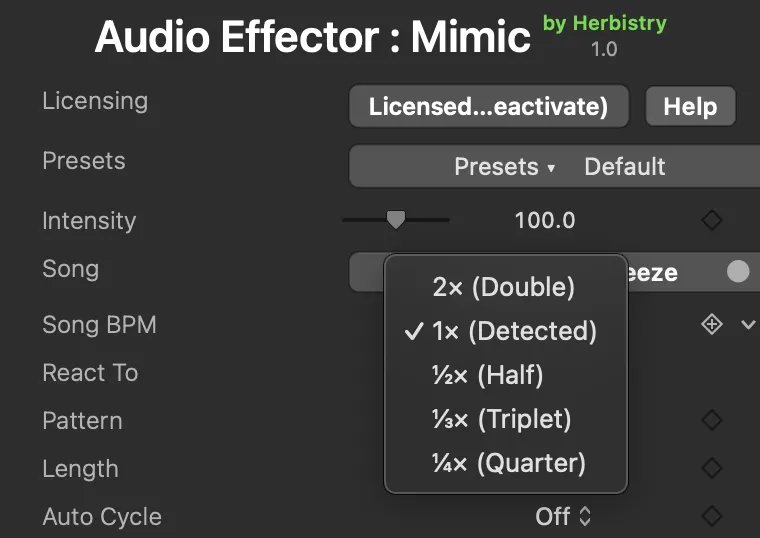
With a song loaded, Song BPM is the tempo dial: run at the detected tempo, or lock the motion to an exact double, half, triplet, or quarter of it.
No music in the project, or you just want a vibe? With no song loaded, Mimic runs on a built-in metronome. Turn on Advanced to reveal BPM, set it to your track's tempo (30 to 300), and the beat-driven folds march along. Beat Nudge, also under Advanced, slides the beat in both modes: 0 is right on it, 0.5 is the off-beat, 1 is a full beat late. Handy when the hits should land on the snare instead of the kick.
Final Cut handles most frame rate mismatches invisibly. The exception is 23.98 or 24 fps footage in a 25 fps project, or 25 fps footage in a 23.98 or 24 fps project: there it changes the clip’s speed by about 4%. Mimic stays locked to your timeline, so the animation keeps matching what you hear and the picture is the thing that shifts. There is no setting to turn this off. Either match your project’s frame rate to your footage, or convert the clip before you bring it in.
The main event
These are the Mirror Looks, the heart of Mimic. Each one is its own on/off switch, not a menu, so you can run one or stack several at once. Turn a look on and it reveals a Strength slider plus one character control. Mirror Spin is on out of the box; the rest start off. Every look leans into one musical move, the dimension it animates on the beat.
A single mirror fold of the frame, the clean, classic symmetry. Its signature move is the spin: the fold axis rotates and snaps on the beat, so the mirror line sweeps around. Mirror Spin Angle sets where the axis starts.
Two folds at once for a four-way, kaleidoscopic quad. It rides the kick: the center hops and the whole thing pops in size on the beat, a punchy, physical hit. Quad Kick Rotation sets the base angle.
A many-wedge mirror kaleidoscope. This one breathes: the number of wedges swings wider and tighter on the beat while the spin stays gentle, so the pattern blooms and contracts. Kaleido Breath Segments sets the base wedge count.
The same many-wedge kaleidoscope, but here the wedge orientation is the star: it rotates and snaps on the beat while the count holds steady. Breath changes how many wedges; Spin turns the ones you have. Kaleido Spin Segments sets the count.
The Droste effect, a picture inside itself inside itself, winding inward forever. It drives off scale: a steady inward zoom with an extra surge on every hit. Droste Zoom Twist spirals the recursion so it corkscrews as it descends.
An infinity tunnel of concentric rings pulling the image into depth. The rings rush inward continuously with a push on each hit. Tunnel Rush Depth sets how many rings deep the tunnel goes, from a shallow funnel to a long dive.
The looks chain, so a Kaleido Spin folded through a Droste Zoom, or a Quad Kick pulled down a Tunnel Rush, gives you something no single look can. Strength runs past 100% for overdrive when you want it heavy. Start from a preset to see a few good combinations, then add or drop a look to make it yours.
How the looks move
The Mirror Looks give you the shape; this is what gives them their groove. Three controls decide the character of the motion and how often it happens. They appear once at least one look is on.
Same fold, ten completely different feels. Pattern picks the archetype the looks perform on the beat, from a lazy drift to full chaos.
How often the look reconfigures. On Beat it is the cycle period, how long one full move takes. On a band mode it is the hit cadence, from rapid-fire at 1/4 Beat to one slow swell at 4 Bars. The choices run 1/4 Beat, 1/2 Beat, Beat, 2 Beats, Bar (4), 2 Bars, 4 Bars.
Set it and the effective Pattern advances on its own, stepping through all ten on a bar cadence: Every 1/16 Bar, 1/4 Bar, 1/2 Bar, or Every Bar. Two extras appear with it: Shuffle Patterns jumps to a random one each step instead of going in order, and Cycle Length evolves the speed as it goes too.
The whole effect can assemble in at the clip head and out at the tail over a few seconds, so it grows out of clean footage and settles back into it. Set the seconds for each end. Leave both at 0 and the effect is full-strength start to finish.
Two fine-tuners for the extra effects' beat pulse (Strobe, RGB Split, Glitch, Bloom), and they only apply with React To set to Beat. Smoothing rounds a hard, steppy pulse (from Patterns like Pinwheel, Stutter, or Frenzy) toward a gentle sine swell, so the effects breathe instead of snap. Invert flips the pulse to the off-beat, so the effects settle on the beat and swell between the hits. Both live under Advanced; neither changes the Mirror Looks' own motion.
On top of the fold
Layered over whatever looks you're running, four classic beat effects. Each is its own switch that reveals a Strength slider (typeable past 100% for overdrive), and each reacts to the beat in its own way.
Darkens the whole frame on the beat, the club strobe. Hard Flash, on by default, gives you one crisp blink per beat; turn it off for a smooth dim that rides the pulse instead of snapping. Its timing follows the same tempo as everything else, so it lands with the folds.
Splits the red and blue channels apart for a chromatic-aberration edge that widens on the hit. RGB Split Rotation aims the split, 0° is a horizontal offset. A nice touch: with Pattern set to Drift, the split width pulses on its own on the Length grid, no audio needed.
Chops the frame into bands and jerks them sideways with scanline noise, a hard digital tear. It reacts as a hard cut, snapping on and off on the beat rather than fading. Glitch Direction aims the tear.
Lifts the exposure and blooms the bright areas so highlights glow and the frame flashes on the beat. Rides the smooth pulse, so it swells and settles rather than blinking. Great for making a drop feel like it's glowing from inside.
Framing
Your base framing, applied before the folds. These sit near the top of the panel and stay put in both modes.
The master dial for how hard everything reacts. It scales every look and every effect at once, so if the look is right but the whole thing is too much or too flat, this is the one slider to reach for. It sits at the top of the panel, right under Presets.
Subtle. The folds barely move off their base pose.
Everything reacts hard. Big hits, deep folds.
Scale zooms the picture in or out before it's folded, Position X and Y slide it, and Rotation turns it. Handy for choosing which part of the frame ends up at the mirror line, or for pushing in so the symmetry lands where you want it.
When a fold or a zoom exposes area past the picture, Edge decides what fills it: Repeat Edge, Mirror, Tile, Background Color, or Transparent. Pick Background Color and BG Color sets the fill. Transparent lets whatever is underneath show through. (On the clip effect; the Title uses its own edge handling.)
No music required
Flip the Classic Mimic switch and the whole panel changes. The audio rig steps aside and you get a pure, hand-driven symmetry toolset, no song, no beat, just the static look and its own animation. This is the full manual mirror rig for when you want to build a symmetry by hand.
The core fold. Mirror is a single reflection you aim with Mirror Angle and Mirror Center; Quad folds it four ways; Kaleidoscope opens up a Segments control for 1 to 32 wedges plus a Rotation. Off skips the fold so you can use just the warp and divider.
Where the picture sits before it's mirrored. Source Offset slides it, Source Scale zooms it, and Source Rotation turns it. Move the source and you change which slice of the frame the symmetry is built from, a whole different pattern from the same shot.
Bend the symmetry further. Warp Mode adds a recursive Droste spiral (with Twist), a Liquid mirror ripple, or an Infinity Tunnel (with Depth). Warp Amount and Warp Scale dial it in, and Warp Blend smooths the ring seam on Droste and Tunnel.
Classic runs on its own clock, no music. Animate Spin turns the symmetry, Animate Breath pulses a kaleidoscope in and out, and Animate Flow moves the warp. Animation Speed sets the pace for all of them. Leave them off for a dead-still frozen look.
Draws a clean line along the mirror seam, the way a classic kaleidoscope shows its edges. Divider Width, Divider Color, and Divider Opacity style it, from a hairline accent to a bold graphic band.
Classic's own edge handling for area the fold exposes: Reflect, Repeat, Wrap, or a solid Color you pick. Reflect keeps the mirror seamless; Color gives you a clean border around the pattern.
One click, full look
A preset sets every control at once: the looks, the pattern, the effects, the framing. Pick one from the Presets menu at the top of the inspector, then tweak anything you like. One thing presets never touch is your song. The look changes, the music stays. Twelve to start from.
Mirror Spin · React to Beat · Drift
The factory state and the instant reset. A single mirror fold drifting slowly to the beat. When a look gets away from you, this is the way back.
Mirror Spin · Pendulum
A single mirror fold that rocks side to side on the beat, the fold axis swinging like a pendulum. Clean and hypnotic.
Kaleido Breath · reacts to Loudness · Strobe + RGB + Glitch + Bloom
A breathing eight-wedge kaleidoscope under a full sugar rush of strobe, chromatic split, glitch, and glow. Bright and busy.
Quad Kick · Breathe · RGB + Bloom
A four-way quad fold that kicks and swells on the beat, with a colored split and a soft glow. A bold, physical hit.
Droste Zoom · Warp pattern · Strobe + RGB + Glitch
A Droste spiral winding inward with a slow mirror turn underneath and a grit of glitch and strobe. Down you go.
Droste + Tunnel · reacts to Bass · Strobe + Bloom
Droste and Tunnel stacked into a slow, bass-driven pull with a soft strobe glow. Deep-space drift.
Tunnel Rush · reacts to Bass · Auto-Cycle · full RGB
An endless tunnel that auto-cycles its pattern under a full chromatic tear, strobe, and glow. Made for the drop.
Strobe + RGB · Drift
A smooth strobe dim with a vertical color split that pulses its own width on the grid, no fold needed. Pure light and color.
Mirror Spin · reacts to Mid · Stutter · heavy Glitch
A vertical mirror that takes turns left and right behind a heavy digital tear. Broken-screen energy.
These three switch Mimic into Classic mode, the pure hand-driven rig with no audio, so they hold a still, sculptural look you can let breathe.
Classic · Mirror · Liquid warp
A watery, swimming mirror distortion that ripples gently on its own. Calm and dreamlike.
Classic · 8-fold Kaleidoscope · Droste
A slow eight-fold kaleidoscope spiraling through a Droste warp, the whole frame breathing. A gentle trip.
Classic · 8-fold Kaleidoscope · Droste · orbiting center
An eight-fold kaleidoscope melting through a Droste spiral with its center slowly orbiting. Full, liquid psychedelia.
Make it yours
Built a look you love? Save it and reuse it anywhere.
It saves the whole look, every control at once, but not your song, so one preset works across every project and every track. Your saved looks live on your Mac, not inside a single project, so they follow you everywhere you edit.
Cheat sheet
The main sliders at a glance, from one end to the other.
| Control | Low end | High end |
|---|---|---|
| Intensity | Low: barely moves off the base pose | High: big hits, deep folds |
| Strength (per look / effect) | 0: off | Past 100: overdrive |
| Build On / Off | 0: full-strength start to finish | Seconds: ramps in and out at the ends |
| Audio Sync | Lower: song reads later | Higher: song reads earlier |
| Sync Frames | Negative: nudge back a frame or two | Positive: nudge ahead a frame or two |
| Beat Nudge | 0: on the beat | 1: a full beat late (0.5 = off-beat) |
| BPM | 30: slow march | 300: double-time |
| Smoothing | 0: hard, stepped motion | 1: rounded, sine-like motion |
| Kaleido Segments | Few: bold, chunky wedges | Many: fine, detailed rosette |
| Tunnel Rush Depth | 1: a shallow funnel | 16: a long deep dive |
| Scale | Low: pulled back | High: pushed in |
| Mix (Title) | 0: original footage | 100: full treatment |
Before you install
Mimic is a Mac video plugin. Here is what you need.
Get help
Trouble installing, syncing a song, or unlocking Mimic? Reach out and we'll sort it.