Download PDF
Arrows icon
Animated arrows & pointersby Herbistry · for Final Cut Pro & Motion

Arrows

Drop an arrow on screen and point at whatever matters. Arrows gives you twenty-one shapes, seven styles, and a set of moves that draw themselves on, all live and razor sharp at any size. Build the look yourself or start from a preset.

The short version

What Arrows does

Drag Arrows onto your timeline and you get an arrow floating over your video, pointing at whatever you want the eye to land on: a button in a tutorial, a player in a sports breakdown, the thing you are reacting to. Pick a shape and it redraws in one click: a clean straight pointer, a chunky block arrow, a road-sign chevron, a hand-drawn graffiti swoosh, a loop, even a trail of stars. Every arrow is drawn live instead of being a flat image, so it stays sharp at any size, right up to 4K.

From there it moves. Arrows can draw themselves on tip to tail, pop in, wiggle, flicker like a neon sign, and spin on a loop. No keyframing required. This manual covers the whole workflow, every control, the shapes, the styles, and the presets.
First run

Install, run, and unlock Arrows

From download to a clean export. Here is the whole path.

  1. Get FxFactory. Arrows installs through FxFactory, the free plugin manager for Final Cut Pro and Motion. Grab it at fxfactory.com if you do not have it already.
  2. Install Arrows. Find Arrows by Herbistry inside FxFactory and install it from there. If Final Cut or Motion was open, restart it so it picks up the new title.
  3. Find it in Final Cut. Arrows lives in the Titles browser. Open the Titles sidebar, look under Herbistry (or just search "Arrows"), and drag it onto your timeline.
  4. Try it free. Every shape, style, and preset works right away, no time limit. The catch is a Herbistry leaf watermark tinting the frame, so the trial is perfect for auditioning but not for a clean export.
  5. Buy and unlock. Purchases happen right inside the FxFactory app. Buy Arrows there and the watermark disappears. FxFactory remembers the license, so it is a one-time thing.

On the timeline

Add it to your timeline

Arrows is a Title, so it floats over whatever is underneath it. Adding it takes three moves.

  1. Drag it on. From the Titles browser, drop Arrows onto your timeline as a connected clip above your video, or onto the primary storyline. It plays over the footage below.
  2. Aim and size it. Set Rotation to point it where you want and Size to scale it. To move it off-center, drag the clip in the viewer the same way you would nudge any other title.
  3. Set how long it stays. Trim the title clip in the timeline to control how long the arrow is on screen, the same as any other title.

One arrow per clip

Each Arrows clip draws a single arrow. Need to point at three things at once? Stack three Arrows clips, one per target, and style each one its own way. There is no limit but your timeline.

Any shape of frame

Because it is a Title, Arrows lays itself out to your project's frame. Wide 16:9, vertical 9:16 for Reels, Shorts, and TikTok, or square: the arrow scales to the frame either way. Size is measured against the shorter side of the frame, so the same setting reads the same in any aspect ratio.

The layout

The inspector, top to bottom

Everything lives in one inspector. From the top down it reads in a few blocks, and the controls that do not apply to your setup hide themselves, so it stays tidy. The deeper sliders sit behind Show Advanced Options at the very bottom, flip it on to see them all.

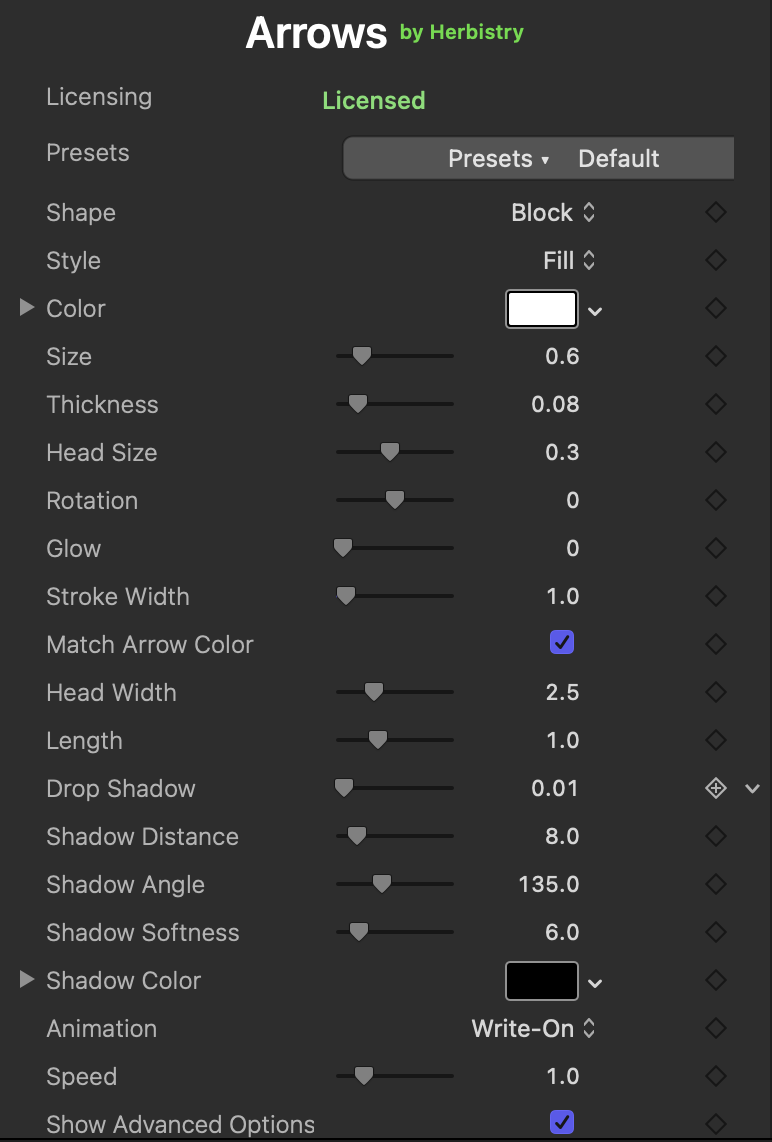
The Arrows inspector in Final Cut Pro, showing the Licensing and Presets rows at the top, then Shape, Style, Color, Size, Thickness, Head Size, Rotation, Glow, Stroke Width, Match Arrow Color, Head Width, Length, the Drop Shadow group, Animation, Speed, and Show Advanced Options.

The Arrows inspector with Show Advanced Options on, so the full set is visible. The arrow is white here and Animation is set to Write-On.

Top of the panel

  • Licensing your license status, with a Buy button while you are on the trial
  • Presets load a full look, or save your own

The arrow

  • Shape which arrow, from Block to Graffiti
  • Style the finish: Fill, Neon, Glass, and more
  • Color the arrow's color, plus Color 2 on a gradient

Size & shape

  • Size overall scale
  • Thickness, Head Size, Head Width, Length the proportions of a geometric arrow
  • Rotation aims it anywhere

Extras

  • Glow a soft halo around the arrow
  • Stroke Width a universal outline, plus Match Arrow Color
  • Drop Shadow Distance, Angle, Softness, Color appear once it is on

Animation

  • Animation an entrance or a looping move
  • Speed the pace, once a move is picked

Show Advanced Options

  • One switch reveals Thickness, Head Size, Glow, Stroke Width, Match Arrow Color, the Head sliders, and the whole Drop Shadow group

Pick a shape

Twenty-one arrow shapes

The Shape menu sets the arrow itself. It splits into two groups: clean Geometric shapes drawn with math, which stay crisp at any size, and looser Hand-Drawn shapes with real ink texture. The default is Block.

Geometric

Pointers

  • Straight the classic line-and-head pointer
  • Block a chunky filled block arrow, the default
  • Chevron a single open V, like a road sign
  • Chevron Stack a row of chevrons marching one way

Curves & bends

  • Arc a smooth curved arrow
  • U-Turn doubles back on itself in a U
  • Corner bends ninety degrees, for "over there"
  • S-Curve an S-shaped sweep to the point

Trails

  • Dashed a dashed line with a head, reads as a route
  • Dotted a dotted trail with a head
  • Circles a trail of circles leading to the tip
  • Stars a trail of stars instead of a shaft

Hand-Drawn

Swooshes

  • Swoosh S a loose hand-drawn S swoosh
  • Big S Sweep a large sweeping S stroke
  • Hook Up a marker stroke that hooks upward
  • Hook Down the same, hooking downward

Loops

  • Curl Loop a single curl before the point
  • Loop the Loop a full loop in the line

Graffiti

  • Graffiti a fat, tagged graffiti arrow
  • Barbed Left a barbed graffiti arrow angled left
  • Barbed Right the same, angled right

The shape sliders follow the geometric arrows

The proportion sliders, Thickness, Head Size, Head Width, and Length, shape the Geometric arrows. The Hand-Drawn ones come pre-built with their own ink, so those sliders quietly step aside when you pick one. Size, Color, Style, and the animations work on every shape.

Pour on a look

Seven styles

The Style menu sets the finish. Color stays separate, it comes from the Color well, so you can put any style in any color.

Fill

The default

A solid, flat color. The clean, readable starting point. When in doubt, start here.

Gradient

Color into Color 2

Blends your main Color into a second color along the arrow. Picking Gradient reveals the Color 2 well.

Outline

Hollow

Just the edge of the arrow, empty inside. Clean and light over busy footage.

Neon

Glowing tube

A bright glowing tube, like a bar sign. Made for night looks and dark backgrounds.

Glass

Glossy

A glossy, slightly see-through panel with a soft sheen. Modern and slick.

Brush

Painted

A painted brush-stroke texture with rough, lively edges. Hand-made energy on any shape.

Grunge

Spray paint

A rough, spray-paint texture with broken, gritty edges. Street and loud.

Style is the finish, Color is the paint

Every style takes its color from the Color well (and Color 2 on Gradient), so Neon can be any color, Grunge can be any color, and so on. Want a border on top of any of them? Turn up Stroke Width and you get a universal outline around any style.

Every control

The controls, one by one

Sizes here are measured against the frame and scaled to your project, so the arrow looks the same whether you render small or in 4K. Most of these sit behind Show Advanced Options at the bottom of the inspector, flip it on to bring them out.

The arrow

Size

0.05 to 3.0

The overall scale, measured against the shorter side of your frame. This is the one thing a preset never touches, so you can flip through every look without resizing.

0.05

A small, subtle marker tucked into the shot.

3.0

Big enough to fill or overflow the frame.

Shape

21 shapes

Which arrow you are drawing, from a clean Block to a Graffiti swoosh. Twelve Geometric, nine Hand-Drawn. Covered in full above.

Style

7 styles

The finish: Fill, Gradient, Outline, Neon, Glass, Brush, or Grunge. Color stays separate, so any style works in any color.

Color & Color 2

The paint

Color is your main arrow color. Color 2 is the far end of a gradient, and it only appears when Style is set to Gradient.

Rotation

−180 to 180

Spins the whole arrow to aim it. It pivots around its own center, so the tip lands where you point it.

Proportions · geometric shapes

Thickness

0.01 to 0.5

How fat the shaft is.

0.01

A fine, delicate line.

0.5

A heavy, chunky shaft.

Head Size

0.05 to 0.6

How long the arrowhead is, as a share of the whole arrow.

0.05

A small, dainty tip.

0.6

A big, dominant head.

Head Width

1.0 to 6.0

How wide the head flares out from the shaft.

1.0

A slim, narrow head.

6.0

A broad, flared head.

Length

0.5 to 2.0

Stretches the shaft, while the head stays the same size.

0.5

A short, stubby arrow.

2.0

A long-reaching arrow.

Glow & outline

Glow

0 to 2

A soft halo around the arrow. Zero is flat; turn it up for a light bloom on any style. Neon glows on its own already.

Stroke Width

0 to 40

A universal outline that draws a border around any style. 0 is off. Push it up for a bold edge on Fill, Brush, Grunge, anything.

Match Arrow Color

On / off

When the outline is on, this keeps it the same color as the arrow. Switch it off and an Outline Color well appears so you can pick a contrasting edge.

Drop shadow

Drop Shadow

0 to 1

The master switch for a drop shadow, dialed by opacity. At 0 there is no shadow. Turn it up and the arrow lifts off the footage, with the four controls below appearing to shape it.

Shadow Distance

0 to 60

How far the shadow is thrown from the arrow. Small for a tight lift, large for a floating, dramatic offset.

Shadow Angle

0 to 360

The direction the light comes from, in degrees. It stays put even as you rotate the arrow, so your scene's light stays consistent.

Shadow Softness

0 to 40

How blurry the shadow edge is. Zero is a hard, graphic shadow; high is a soft, diffuse one.

Shadow Color

Black by default

The shadow's color. Black reads as a normal shadow; tint it for a colored glow-drop under the arrow.

Make it move

Animate the arrow

The Animation menu adds motion, no keyframing. It splits into one-shot entrance moves that play once when the clip starts, and looping moves that run the whole time it is on screen. Speed sets the pace and shows up the moment you pick a move.

Entrance · plays once

Draw & build

  • Write-On draws itself on, tip to tail
  • Organic Cells builds up in a spray of cells

Pop & slide

  • Pop springs in with a little overshoot
  • Fade + Slide fades up and eases into place

Streak & buzz

  • Phase a motion-blur streak that settles in
  • Neon Flicker buzzes on like a sign warming up

Looping · runs the whole time

Living motion

  • Wiggle a loose, hand-held jitter
  • Pulse the tip throbs in and out

Sway & buzz

  • Phase a steady motion-blur sway
  • Neon Flicker a constant neon buzz

Spin

  • Spin rotates around on a loop

Phase and Neon Flicker show up twice

You will see Phase and Neon Flicker in both lists. One is a one-shot entrance, the other runs forever, same name. The section it sits under, Entrance or Looping, tells you which one you are picking.

Speed

0.25 to 4.0

How fast the move plays, for both entrances and loops. It only shows up once you have picked an animation.

0.25

Slow and deliberate.

4.0

Fast and snappy.

One click, full look

Presets

A preset is the whole look at once: shape, style, colors, finish, aim, and any animation. Pick one from the Presets menu at the top of the inspector, then tweak anything you like. The one thing a preset never changes is your Size, so the look swaps without resizing the arrow you already placed.

Professional

Presentation

Chevron · solid blue · Write-On · soft shadow

A clean blue chevron that draws on with a soft drop shadow. Boardroom-ready callouts.

Explainer

Corner · baby blue · blue outline · aimed down

A baby-blue corner arrow aimed downward with a crisp blue outline, drawing itself on. Made for "look right here."

Minimal Guide

Straight · thin gray · slow Write-On · shadow

A thin, neutral gray pointer that eases on slowly. Quiet and out of the way.

Social

Going in Circles

U-Turn · green · yellow outline · Spin

A glowing green U-turn ringed in yellow that spins on a loop. Loud and impossible to miss.

Neon Night

Chevron Stack · neon pink · Flicker loop

A stack of hot-pink chevrons buzzing like a neon sign. Built for dark, moody footage.

Hype Loop

Loop the Loop · purple-to-pink · Pulse loop

A purple-to-pink gradient loop that pulses without stopping. Stream overlays and repeat CTAs.

Lifestyle

Food

Dotted · amber brush · Pulse loop

A warm amber dotted trail with a painted brush finish, gently pulsing. Recipes and menus.

Graffiti

Barbed Left · orange-to-pink · Fade + Slide

A barbed street arrow in an orange-to-pink gradient that slides in. Tagged and loud.

Hand-Drawn

Graffiti shape · glass · near-black · Write-On

A glossy near-black graffiti arrow that draws itself on. Inky and slick.

Bling Bling

Block · white grunge · fast Neon Flicker

A white grunge block with a matching outline, flickering fast. Flashy on purpose.

Utility

Bold Outline

Block · thick white outline · Pop

A hollow white block with a heavy edge that pops in. High-visibility on dark or busy shots.

Dashed Guide

Dashed · baby blue · Write-On · shadow

A baby-blue dashed route that draws on with a hard shadow. Reads as a path to follow.

This Is It

Stars · red neon · blurs in (Phase)

A red neon star trail with a white core that streaks in. The "pay attention to this" arrow.

Start from Default

The Default preset at the top is a true reset: a white Block, Fill style, no animation. It mirrors a fresh insert exactly, so it is the clean slate to come back to whenever you want to start over.

Make it yours

Saving your own presets

Built a look you love? Save it and reuse it anywhere.

  1. Dial in the look until it is right.
  2. Open the Presets menu at the top of the inspector and choose Save Current Settings…, then give it a name. (If that name is already taken, it asks before replacing.)
  3. It shows up under My Presets in that same menu, ready to load in any project. To change it later, open its submenu there and use Rename… or Delete.

Where your presets live

Each preset you save is a small file on your Mac, in your home folder under Library ▸ Application Support ▸ Herbistry ▸ Arrows ▸ Presets. (That Library folder is hidden by default: in Finder, hold Option and open the Go menu to reach it.) Because they live there and not inside one project, your looks follow you across every project, and you can copy a preset file and send it to someone else so they get the exact same look.

Cheat sheet

Quick reference

Every slider at a glance, from one end to the other.

ControlLow endHigh end
Size0.05: a small marker3.0: fills or overflows the frame
Thickness0.01: a fine line0.5: a heavy shaft
Head Size0.05: a dainty tip0.6: a dominant head
Head Width1.0: a slim head6.0: a broad, flared head
Length0.5: short and stubby2.0: a long reach
Rotation−180: aim it anywhere180: aim it anywhere
Glow0: flat2: a bright halo
Stroke Width0: no outline40: a heavy border
Drop Shadow0: off1: a solid shadow
Speed0.25: slow and deliberate4.0: fast and snappy

Before you install

System requirements

Arrows is a Mac title plugin. Here is what you need.

Operating system
macOS 13.5 or later
Ventura and up.
Works in
Final Cut Pro 10.8.1 / Motion 5.8 or later
As a Title you drop on the timeline.
Mac type
Apple Silicon Mac
Runs natively on M1, M2, M3, and later.
Installing
Through FxFactory
Install, buy, and unlock in the free FxFactory app.

Get help

Stuck on something?

Trouble installing, styling, or unlocking Arrows? Reach out and we'll sort it.

Contact support →