Now-playing card generatorby Herbistry · for Final Cut Pro & Motion
Herbistry Music Player
The now-playing card you know from your phone, right inside Final Cut. Herbistry Music Player drops a clean, modern music-streaming-style card onto your timeline. Album art, track and artist, a progress bar, a waveform, playback buttons. Type in your track, pick a skin, and place it. It's free, and it's yours to keep.
The short version
What Music Player does
Add it as a generator, drop your footage or a music visualizer on the track below, and you have a slick now-playing card sitting on top. Drop in album art, type the track title and artist, and set the progress and the run time. Choose from seven skins, from frosted glass to bold art panels, and three card shapes for a reel, a feed post, or widescreen. The whole background is see-through, so whatever is underneath shows straight through the empty space.
One thing to be straight about up front: the waveform is a look, not a listener. Final Cut does not let a generator hear your timeline, and Music Player does no audio analysis at all. The waveform animates to a tempo you type, so it moves in time without ever needing your song. This manual covers the whole setup and every control, top to bottom.
First run
Get it, and add it
Music Player is free and unconditional. No license key, no watermark, no trial clock. Here is the whole path from download to a card on screen.
Grab it, free. Head to the Herbistry Music Player page on fordeetv.com. It costs nothing. Pop in your email at checkout and download the installer.
Install it. Open the installer and follow along. It is notarized by Apple, so there are no security warnings to fight. If Final Cut or Motion was open, quit and reopen it so it picks up the new plugin.
Add it to your timeline. Music Player is a generator, not a clip effect. In Final Cut Pro, open the Generators browser, find Herbistry ▸ Herbistry Music Player, and drag it onto your timeline. Put your footage, a background, or a music visualizer on the track right below it, since the card plays over whatever is under it. More on that just below.
That's it. Every skin, layout, and control works from the first second. Nothing to unlock, nothing to activate, nothing counting down. Yours to keep.
All on your Mac
Music Player does all its work on your machine. Your artwork and your project never leave your computer. It is a drawing tool, not a network tool, so there is nothing phoning home and nothing to sign into.
Where it goes
It's a generator, and the background is see-through
This is the one thing to get right, so here it is clearly. A generator makes its own picture from nothing, so it does not sit on your footage. It sits on its own layer, above it. And everywhere the card isn't, Music Player is transparent, so your footage or your visualizer shows right through.
Do this
The setup that works
Add Music Player as a generator, on its own layer.
Put your footage, a background, or a music visualizer on the track right below it.
Type your track details and pick your artwork in the inspector.
The card draws over transparent space, so everywhere around it your layer below shows straight through.
Not this
Common mix-ups
Don't drop it onto a clip like a filter. It isn't one, and it won't attach.
Don't expect the waveform to hear your song. It runs on a tempo you type, never on audio.
Don't hide your background above it. Backgrounds go underneath.
The see-through part is the whole idea
That empty space around the card is on purpose. Because it is transparent, you can run anything you like behind it: your own footage, a solid color, or one of Herbistry's music visualizers reacting to the beat. Music Player is the clean player card up front; whatever you put underneath is the show behind it. It works the same in Motion, added as a generator layer with your footage below, and it fills whatever shape your project is, vertical, square, or widescreen, with no black bars.
The layout
The inspector, at a glance
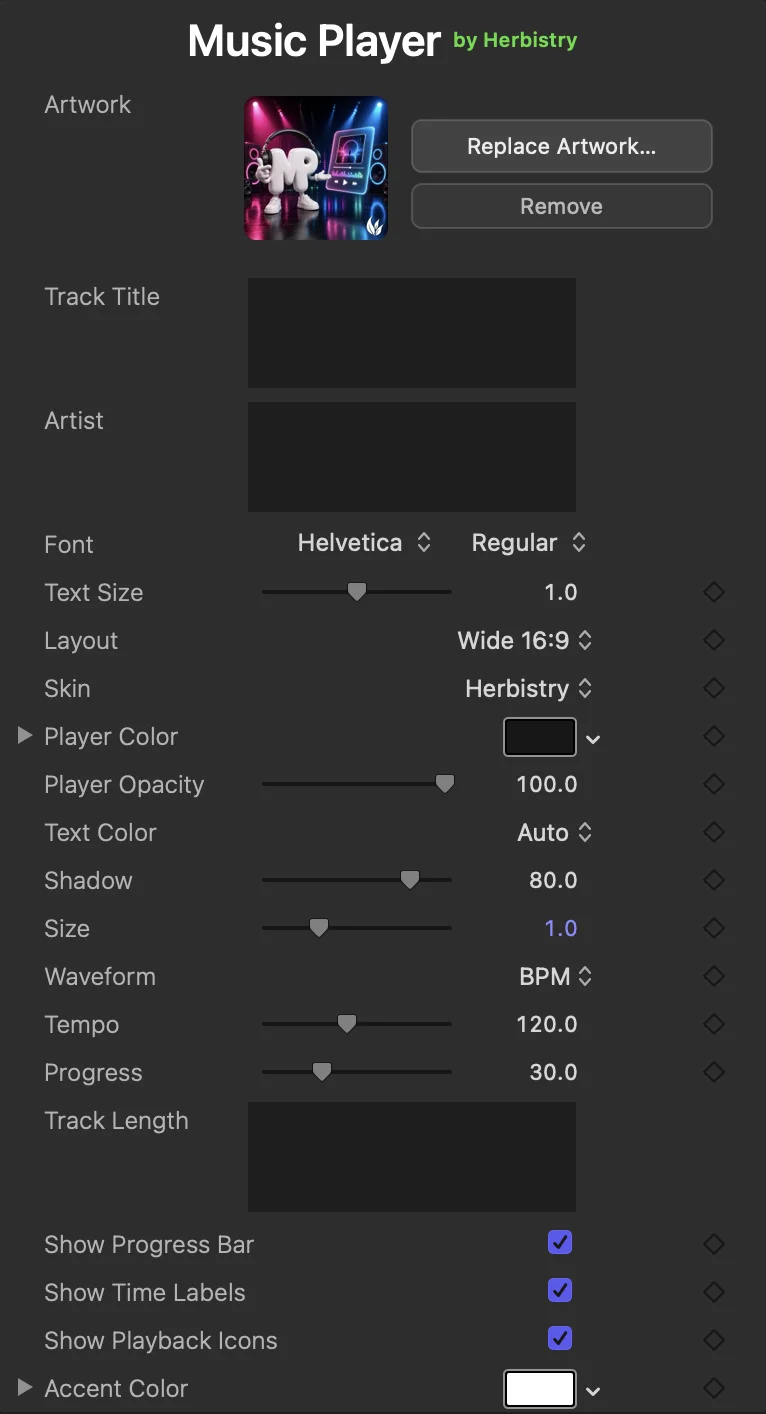
Everything lives in one inspector, and it reads top to bottom. A few controls hide themselves when they don't apply, so the panel stays tidy: the Tempo slider only shows in BPM mode, Player Color hides on the art skins and Minimal, and the Shadow slider only appears when Text Color is on Auto. Here is the whole panel, then a breakdown grouped by what each part does.
The full inspector, top to bottom. The controls that don't apply to your setup hide themselves, so you may see fewer rows than this.
Your track
Artwork drop in an album cover or any image
Track Title the song name on the card
Artist the line under the title
Font the typeface for both lines
Text Size nudge the text up or down within its row
Shape & skin
Layout vertical, square, or wide card
Skin seven looks, from glass to art
Size scale the whole card up or down
The player look
Player Color the panel fill, on Glass and Solid
Player Opacity how solid the panel reads over bright footage
Text Color Auto, Light, or Dark
Shadow the Auto legibility shadow
Accent Color tints the waveform, bar, and arrows
Waveform
Waveform None, Static, or BPM
Tempo the beat the waveform pulses to, in BPM mode
Playback
Progress how far along the bar reads
Track Length the run time, like 3:41
Show Progress Bar the bar and its dot
Show Time Labels elapsed and remaining times
Show Playback Icons the transport buttons
Fill in the card
Your track: the words and the art
The top of the inspector is the content. This is where the card becomes your song instead of the placeholder.
Drop in the artwork. Click the Artwork well and choose an image, an album cover, a still, a logo, anything. It gets baked into the project, so it travels with your library and it is right there when you reopen. Clear it and the card falls back to a clean placeholder.
Type the track and artist. Put the song name in Track Title and the artist in Artist. Pick the typeface for both in the Font menu.
Set the run time and progress. Type the song's length into Track Length, like 3:41, and drag Progress to how far along you want the bar to sit.
Trim what you don't want. Turn off Show Progress Bar, Show Time Labels, or Show Playback Icons to strip the card down to just art and text if that's the look you're after.
The content controls
Artwork
Drop an image
The cover art on the card. Click the well and pick any image and Music Player fits it into the art slot. It is stored inside your project, so it stays put when you close and reopen, and it comes along if you move the library. Big images are scaled down for you, so you don't have to prep anything first.
Empty
A clean placeholder tile, so the card still reads.
Set
Your cover art, baked into the project.
Track Title & Artist
The two text lines
The song name and the artist under it, the two lines every player has. Type them straight in. They pick up your Text Color and skin styling automatically, so they stay readable on whatever skin you land on.
Font
Typeface
The typeface for the title and artist, from your Mac's full font list. A rounded sans reads friendly and modern; a tight condensed face reads more like a label. Both lines share the one font.
Text Size
0.5 to 1.5
A nudge on the text size within its row. Fonts fill their space differently, so some land looking tiny and some crowd the line. This is the tuning knob to even that out. It moves the text inside the card, it does not blow the whole thing up, that's what Size is for.
Shape it
Three layouts, one Size dial
Music Player fills whatever shape your project is. The Layout menu sets the shape of the card itself, and Size scales it up or down inside the frame.
Vertical 9:16
The tall cardart up top, text and controls stacked below. Made for a reel or a story.
Square 1:1
The feed carda balanced square with the art beside the text. Made for a feed post.
Wide 16:9
The widescreen carda low, wide bar with art on the left. The widescreen and hero shot.
Size
0.2 to 3.0
Scales the whole card up or down in the frame. Because it scales the drawing itself instead of stretching a rendered image, the art, text, and edges stay crisp at any size. Turn it down to tuck the card into a corner, up to make it the centerpiece.
Small
A compact card, off in a corner.
Large
Front and center, the whole frame.
Layout and Size are different jobs
Layout is the shape of the card, tall, square, or wide. Size is how big that card is in the frame. Pick the layout that suits your project, then use Size to place it. Wide is the one most people reach for as the marketing shot.
Pick a look
Seven skins
The Skin menu is the surface of the card. Same track, same layout, seven completely different looks. It starts on the Herbistry skin, the house look, and you can swap it any time.
The built-in three
Glass
Frosted material · your fill color
A real frosted-glass panel with a soft bevel, a directional light, and a specular streak across the top. It holds up even at full strength and over bright footage, because it carves the surface as much as it lifts it. Set the tint with Player Color.
Solid
Flat fill · your fill color
A clean, flat panel in whatever color you pick. The simplest, most legible surface, and the one to reach for when you want the card to sit quietly and let the artwork do the talking. Set the fill with Player Color.
Minimal
No panel · outlined elements
No panel at all. The artwork, waveform, progress bar, and buttons get a clean outline in your Text Color, with a subtle halo so they read against a busy background. The floating, panel-less look. Player Color and Player Opacity step aside here, there is no panel to fill.
The art skins
Herbistry
The house look · default
The graffiti-styled brand panel Music Player ships on. Bold, colorful, and unmistakably Herbistry. The default, and a great starting point before you go hunting for your own look.
Abstract
Painterly texture
A soft, painterly abstract wash across the panel. Colorful without shouting, and it plays nicely under white or dark text plates.
Circles
Geometric pattern
An overlapping-circles pattern, playful and rhythmic. A bit of retro energy without tipping into busy.
Crystals
Faceted texture
A faceted, crystalline surface with depth and sparkle. The most dramatic of the art panels, great for a hero shot.
How the skins use color
On Glass and Solid, you set the panel with Player Color. The four art skins bring their own texture, so Player Color steps aside there, but you can still dial Player Opacity to pull a busy skin back so the text stays readable. On Minimal there's no panel to color at all. The art skins also lay a soft plate behind the text in Light or Dark mode so the words always read over the pattern. See the next two sections for the color and text controls.
A look, not a listener
The waveform
Here is the honest bit, and it is by design. The waveform does not listen to your song, it can't, and Music Player does no audio analysis at all. What you get instead is a clean animated waveform that pulses to a tempo you type. It is a vibe, and it is meant to be.
Waveform
None · Static · BPM
What the waveform does. None hides it for a cleaner card. Static draws a still waveform shape that just sits there. BPM makes it pulse in time, and that is the default. Pair it with the Tempo dial below.
None / Static
Hidden, or a still shape. No motion.
BPM
Pulses along to the tempo you set.
Tempo
40 to 220 BPM
The beat the waveform pulses to, in BPM mode. Type in your track's tempo and the waveform grooves along in time. It only shows when Waveform is set to BPM, since it doesn't do anything in the other two modes. Not sure of the number? 120 is a safe, natural mid-tempo that reads well on almost anything.
Want it to actually move with the music?
That is a different tool, and it's the reason the background is see-through. Herbistry's Audio Effector visualizers, Equalizer and Mimic, read your song and react to the real audio: bars on the bass, the works. Run one of those on the track below Music Player and you get both at once, the clean now-playing card up front and a real reactive spectrum playing behind it.
The transport
Progress, run time, and the buttons
The bits that make it read like a real player: the bar, the times, and the transport buttons. Each one is yours to keep or cut.
Progress
0 to 100
How far along the track reads, as a percentage. It sets where the dot sits on the bar and splits the elapsed and remaining times to match. Freeze it wherever looks right, or keyframe it to crawl across the shot.
Track Length
Run time
The song's full length, typed like 3:41. The card works out the elapsed and remaining times from this and the Progress dial, so the two time labels always add up.
Show Progress Bar
On / off
The progress bar and its dot. Turn it off for a stripped-back card that's just art, text, and buttons.
Show Time Labels
On / off
The elapsed and remaining times sitting at the ends of the bar. Off when you want the bar clean, or when you'd rather not commit to a run time.
Show Playback Icons
On / off
The transport buttons, previous, play, and next. Keep them for the full player look, or drop them for something more like a poster.
Color it in
Color and legibility
Five controls set the card's color and keep the text readable over anything you put behind it. A couple hide themselves when they don't apply, so you'll only ever see the ones that matter for your skin.
Accent Color
The highlight
Tints the lively parts of the card: the waveform, the filled part of the progress bar, and the skip arrows. It starts white for a clean, neutral player. Set it to your brand color, or pull a color out of the artwork, to tie the whole card together. The play button stays white on purpose, so it always reads as the main action.
Player Color
Glass & Solid
The panel fill on the Glass and Solid skins. This is the base color of the card itself. It hides on the art skins, where the texture is the fill, and on Minimal, where there's no panel at all, so you won't see it unless it can do something.
Player Opacity
Not transparency
Despite the name, this is not a see-through slider. It sets how solid the panel reads. Turn it down and the surface fades toward a solid tone, dark under light text, light under dark text, so the card holds its own over bright, busy footage instead of dissolving into it. It's how you dial a loud art skin back so the text still reads. It works on every skin that draws a panel, and hides on Minimal.
Low
The panel settles toward a flat, calm tone.
100
Full-strength skin, glass streak and all.
Text Color
Auto · Light · Dark
Auto reads the panel and picks light or dark text to suit, the clean, hands-off default. Because the background behind the card is unknowable, Light and Dark let you force it: pick the one that reads against your footage. On the art skins, Light and Dark also lay a soft plate behind each line so the words never get lost in the pattern.
Shadow
Auto only
Auto's legibility aid: a soft drop shadow under the text and elements, since Auto skips the plates and outlines the other modes use. 0 is none, 100 is a solid black shadow, and anywhere between is a gentle lift off the background. It only shows when Text Color is on Auto, because that's the only mode it does anything in.
Cheat sheet
Quick reference
The sliders and menus at a glance, from one end to the other.
Control
One end
The other
Text Size
0.5: smaller text in the row
1.5: larger text in the row
Layout
Vertical / Square
Wide (the hero shot)
Size
0.2: a small corner card
3.0: fills the frame
Progress
0: start of the track
100: end of the track
Waveform
None / Static: no motion
BPM: pulses to the tempo
Tempo
40: a slow pulse
220: double-time
Player Opacity
0: panel settles to a flat tone
100: full-strength skin
Text Color
Auto: reads the panel for you
Light / Dark: you force it
Shadow
0: no shadow (Auto only)
100: solid shadow under text
Before you install
System requirements
Music Player is a Mac video plugin. Here is what you need.
Operating system
macOS 13.5 or later
Ventura and up.
Works in
Final Cut Pro 10.8.1 / Motion 5.8 or later
Added as a generator layer.
Mac type
Apple Silicon Mac
Runs natively on M1, M2, M3, and later.
Price
Free
A notarized installer from fordeetv.com. No key, no watermark.
Get help
Stuck on something?
Trouble installing, finding it in the Generators browser, or getting a card to show? Reach out and we'll sort it.