 Fordee
Tempo Marker by Herbistry
Edit to the beat,
without the guesswork.
Punch in your track's tempo and get a frame-accurate beat marker grid for Final Cut Pro, Premiere Pro, or DaVinci Resolve. It lands on every beat and never drifts the way markers tapped in by hand do. Runs right here in your browser, nothing to install, nothing to pay.
How to use it in Final Cut Pro
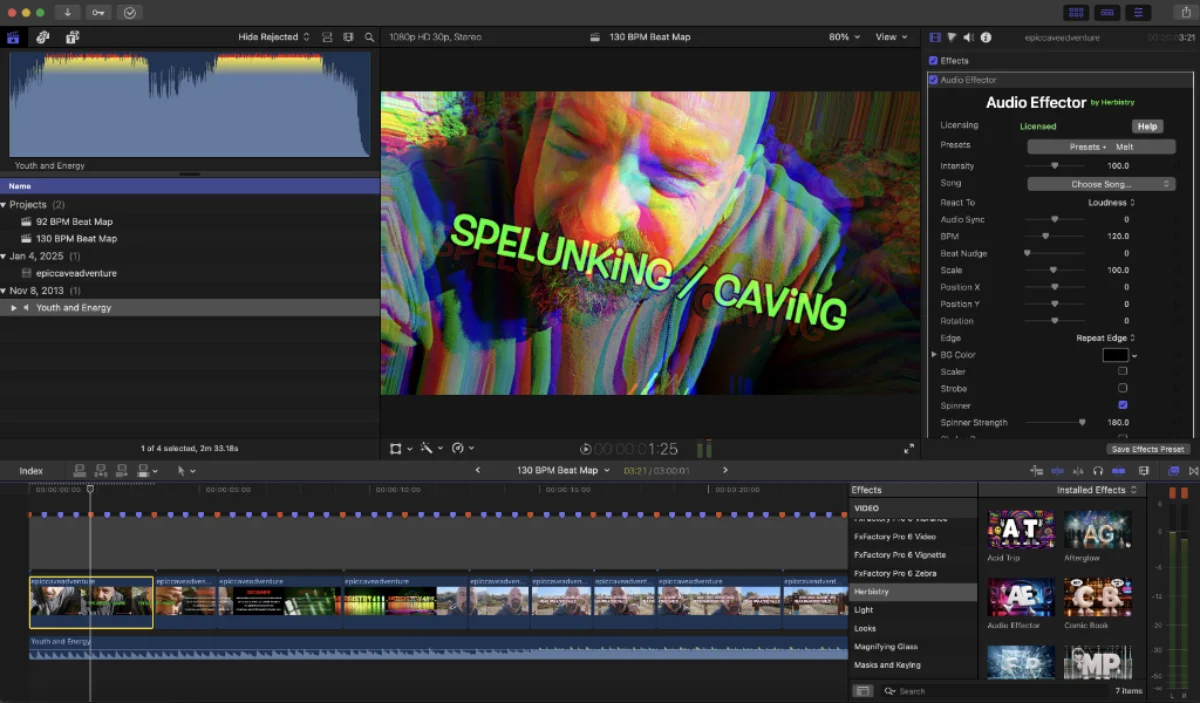
Don't drop your footage onto the ruler clip. The blank clip this tool makes is just a marker ruler. Keep your real footage on its own layer, above or below it, and cut to the lines. Drop a clip straight onto the ruler clip and the markers get wiped, they don't transfer over.
- We set the BPM, frame rate, time signature, and how long we want the grid, then hit Download.
- In Final Cut we go File, Import, XML, or just drag the file in. A new project opens with the whole grid sitting on one long clip.
- The generated clip is your ruler. We drop the song and footage underneath it and cut to the marker lines. The red ones are the downbeats, the start of each bar.
- If the track doesn't start right at zero, set the Start (seconds) offset above so beat 1 lands where the music drops.
No tapping along, no drift, no math homework. Set the tempo and go.
How to use it in Premiere Pro

Match the frame rate to your sequence. Premiere brings the markers in green, every one of them. It drops the color, so downbeats won't stand out from the off-beats here. The lines still land frame-accurate, and that's the part that matters.
- We set the BPM, frame rate, time signature, and length, then hit Download to grab the .xml.
- In Premiere we go File, Import, and pick the .xml. It comes in as a sequence.
- We double-click that sequence in the Project panel to open it. The beat markers are already sitting on it.
- We drop the song and footage onto the same sequence and cut to the marker lines.
Same grid, same math, straight into Premiere.
How to use it in DaVinci Resolve

Be on the Edit page, and match the frame rate. The EDL's frame rate has to match your timeline's or the markers won't line up. Downbeats come in red, the off-beats blue. This works in the free version, and the markers land right on the timeline, no ruler clip needed.
- We set the frame rate to match our Resolve timeline, then hit Download to grab the .edl.
- In Resolve we switch to the Edit page. The page buttons run along the bottom of the window.
- In the Media Pool we right-click the timeline and choose Timelines, Import, Timeline Markers from EDL.
- We pick the .edl and the beat markers drop straight onto the timeline.
Markers right on the timeline, free version and all.